Showing posts with label capture. Show all posts

Making that Winning Shot!

0


Recently, one of my photos was featured in a photo competition by photocrowd and was subsequently carried by The Telegraph in the UK.

A lot of you would have asked, how this the picture came about? Fluke shot? The only way to tell is to look at a photographer's workflow or raw reel. From here you can tell what he was seeing. I had the pleasure of seeing these raw workflow from Michael Yamashita of NG and Michael Freeman when working with Sony Asia Pacific. And from this, you can tell where they were hitting and framing their shots.

This is something that most photographers do not want to share with you, choosing only the shortlisted or best shots. So you never learn what really happened.

Video of the Shots in Action


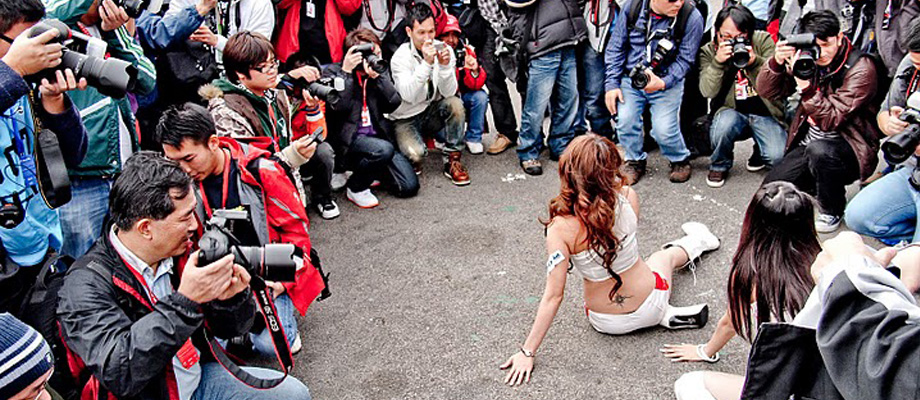
This was captured about five years ago, in Macau during the annual Grand Prix meet and the girls in the paddock were all strutting their wares (sponsor logos) and in it, I could not believe the number of photographers on hand to capture what was going on.

So throughout the three days, I was actually busy capturing content for a iPhone app and for that, there were lots to see and do.

The workflow for the winning shot is seen in the video enclosed and there was a few misses when people walked onto the frame, which happens very often.

When you are working in a hot and crowded environment, things are expected to go wrong, and with people walking all over the place, this is bound to happen.

A photo opportunity is missed because someone walked in, not caring if they were in frame and out again and as you wait for the moment to clear, that moment is history. You never get your shot.

This is why in digital, you have the option of working fast.

Angle of the frame is very important as you can see from the workflow shots in the video. In the shortest time possible, you have to nail this. And this isn't just from the perspective you want, that is on eye level.

Most of the time, photographers see scenes only from eye level. Sure you can have a variety of shots by zooming your lens in and out to frame it but going higher and lower is to me, your sense of perspective. This is what the photographer's eye is all about.

The camera I was using, a G1 from Panasonic didn't have that freedom as it was the first generation M43 sensors. I still love this camera and use it once in a while. It's dated of course, with a 12 megapixel sensor, my smartphone is a Galaxy Note 4 with 16 megapixels. So that's how far behind technology from yesteryears is.


I tried to make several shots of different crops. One was without the photographers in the picture, the others included them in various angles. The winning shot was cropped as there was someone walking right into frame.

Because the girls themselves were the main subject, the background became secondary. You basically shifted the main subject from across the frame, from center to off center to see how it works.

You cropped tight, and wide both while maintaining the perspective of the models. Remember when shooting such scenes, the environment is very fluid. They can be posing like they are now but not later. So no two scenes are going to be the same even if the models are hanging around the paddock area all the time.

Fortunately, the Sun was shining brightly, and into my LCD display which made it difficult to shoot. The color of the wings and attire just jumped out of the picture. So this was the main reason why it looked good. 

Stock Options?


The other thing is that, the photo itself has no commercial value if you include photographers in the picture, including the models' faces also means your photo is pretty much worthless when the faces are identifiable. This is main reason why I took the shot, one of the photographers shooting them for editorial value, the others without the photographers for stock image value.

To further enhance the image stock value, you have to personally remove the logos on the model's attire. A process I have yet to find time to do.

So if you happen to chance upon moments like this, think first about the sort of photos you wish to capture. Include both editorial and stock image possibilities as who knows? You might get lucky.


The Good, the Bad & Ugly of More Megapixels

0
Coloredorginal

I have often been asked about the Megapixel debate, is it some urban legend? Folklore? Or some old wives tale perpetuated by camera manufacturers? But what I am going to say is going to be based on facts, and having worked with Sony's DSLR division, I sort of know the good and bad of the megapixel race. All too often, we find ourselves confronted with decisions on which camera is better based on just the megapixel count of a sensor. Now more megapixel means more detail in a picture but only if it is exposed well. Put that context into a low light scene, the sensor's sensitivity comes into play and this negates any gain in detail. But let's not work on that. Let's assess what more megapixels will do for you.

The Good side of More Megapixels

Henri Cartier Bresson of Magnum, known fondly as HCB, didn't like his photos cropped but with more megapixels, cropping is actually good. Let's use a photo I took as an example. The original is above. Let's do a HCB time lapse into the world of B/W photography and turn this into a contrasty picture of a street scene.

Uncroppedmegapixel
The composition isn't spot on. There is lot of room and in the editorial room, it would be considered a "loose" photo since it is not tightly composed.


Croppedmegapixel
Here is the cropped photo, by throwing away rougly 1/3 of the size of the photo, it becomes a better picture. So if you happen to be shooting with a 24 megapixel DSLR, this image would be roughly 24MB in RAW size and after cropping, a third of frame, you are still left with 18MB of image data. Now that is a big image!

The BAD of having More Megapixels

High density sensors cost more to manufacturer and low light handling isn't as good.
Often, dynamic range will suffer as these smaller high density sensors just doesn't have the muscles compete unless helped along with brute force noise reduction steroids. Larger sensors handle light better but large high density sensor cameras also cost a bomb to own.

The UGLY side of More Megapixels

If you look at the above cropped pictures, and realize that you can take a "loose" picture and still rescue it later with cropping, don't you think that you'd be a loose photographer than a tight one? Pros everywhere have one strong point, they don't need any image cropping for it to come out right. Should you rely on more megapixels to save your day, then you will forever be dependent on it. By relying on post production miracles, you'd stop being a photographer and more of an image manipulator. This is the ugly side of photography which we all try to avoid but get sucked into. Cropping your image in-camera is the best way to go if you want to improve your sense of composition.


Conclusions

There is no right or wrong way to see this Megapixel Myth. The more insecure you are about your pictures, then the obvious route to take is to have more megapixels. The more confident you are about your photography, then the megapixel myth would have fallen away from you mind and in essence make you an even better photographer. So learn to work with what you have.

Shooting Speed: Motion Capture on the Fast Lane

0

Speed. For professionals who hang around the track all day shooting racing cars, you pretty much end up with the same type of images because you are restricted by the angle that you are allowed to shoot. Often you find the same type of images floating around on the Web that shows some kind of speeding vehicle frozen at the exact moment in time. For stuff like this, you can't capture this unless you have a DSLR capable of up to 1/2000 of a sec shutter speed.

For me, I prefer shooting motion rather than freezing them as this gives a different look to the images instead of the same old, same old styles seen everywhere from billboard advertisements to print and web advertising.

When I started shooting these, I was still shooting on film. Imagine what I could have done with digital as it would have been a whole lot easier with the top of the line DSLRs you have today.

But the way forward is still the same. You gotta know your shutter speed. For motion capture like these, you need to know how to pan the camera.

Panning, as you follow your subject through a fixed path of motion, is what gives you the ability to capture speed and motion in your pictures.

Motion Capture Tips


  1. The best shutter speed to capture motion is 1/125 sec
  2. Make sure your subject is moving in a parallel line to your panning movement
  3. AF should be OFF (if you haven't got a spiffy DSLR with super fast AF)...AND 
  4. Prefocus your Distance to Subject
  5. Use a Monopod to steady your panning

The aperture value is irrelevant as long as there is sufficient light. If there isn't then dial up your ISO to 1600 and preset your Shutter Speed to 1/125. In the days of film, photographers were handicapped by the film speeds of between ASA/ISO 100 to 400. Shooting with ISO speeds of 800 were not widespread due to the grain. That is irrelevant these days with digital cameras which perform well with minimum grain at ISO3200.

Minimizing Background Blur at 1/250

Seems like it is frozen but notice that the wheels are turning
For others, you may want to minimize background blur by shooting at a slightly higher speed of 1/125 just to get the wheels in motion. This depends heavily on the distance to subject and of course the telephoto lens you are using. Shorter lenses (200mm) will need to capture at shutter speeds of 1/125 whereas longer telephoto lenses (above 300mm) will require shutter speeds (between 1/250 to 1/500). Longer telephoto lenses tend to magnify movement so less panning movement is required. The movement is very much amplified at longer telephoto lenses, say between 300mm to 800mm so you need to judge the speed in which the car or bike is carrying on a straight or around corners. The important thing here is to mount your gear on a monopod. You could also fashion a monopod out of a Tripod if you didn't know any better. Just don't use all three legs and only extend ONE of the legs out to help you balance your gear. Hand holding your camera is no recommended at longer focal lengths.


Shooting Around Corners

Motion panning can be done around corners as well but the effect is different, meaning that the subject is less sharp and appear to be blurry. That's because you use a slow shutter speed of 1/60 sec.

All vehicles will have to slow down to take a corner and when you are sitting smack in the middle of one, then you will be using a wide lens instead of a telephoto lens. A standard 50mm lens (full frame) would suffice.

You can of course use a wide angle lens such as a 35mm or 28mm if you are really close to the action—like when you can extend your hand out to touch them but that is rarely the case with racing circuits.


Freezing Motion

When you have a DSLR capable of 1/2000 sec shutter speed. It is very easy for you to freeze motion. You can also freeze motion at 1/250 when the vehicle is in low speeds around corners.


This is probably the first place you will find most trackside photographers camping out. They will of course choose the same angles as everyone else as action shots don't really differ much from one location to another when you want to freeze the action. Getting to a high or low place depends on your access to the track. If you have clear access to trackside shooting spots, you will probably get a chance to use a longer telephoto lens on dedicated racing circuits.

Street circuits, like Monaco and Macau, require lower telephoto ranges, around 200mm and less since you don't have a lot of places on the track which you can fully utilize 300mm. The most common uses for a 300mm lens is a head on shot during the start of the race as all the cars are bunched up together running into the first corner. After this, you'll have to pick out your targets one by one as the race progresses.