Showing posts with label DSLR. Show all posts

Shooting Panoramas, how Technology Democratised the Business

0
During the dark age of film photography, getting a panoramic picture meant getting a dedicated camera that could pan the lens at a 180 degree angle or more. In the 90s, there was the Widelux which did this splendidly and after that, it was the Hasselblad Xpan which I grew to love but could never afford. These cameras would use two 35mm frames to capture a scene, allowing for a wide angle picture which was very rare to find. For one, there was no way you could hand hold this steady enough and you needed a tripod to help you do the job. Picking a scene and how you exposed it was a matter of science, as the aperture was normally fixed (except in the case of the Xpan). 


After that, I never bothered to look into this genre of photography ever again until the late 2000s when I was asked by Sony to manage a project where one of the photographers, Paul Daly, was a professional panoramic photographer. Nomadic planet were asked to produce a series of pictures for Sony Asia Pacific using Sony DSLRs. 

To begin with, shooting a pano might seem easy but he had to do a lot of work to do with those DSLRs. First you needed a tripod, and because it was in portrait orientation you had to make several overlapping shots to ensure the computer program you used to stitch the picture was done correctly, and yes, you actually had to buy panoramic stitching software in order for this to work. 


Next was the lens, a 50mm for full frame would be just nice but Paul said he preferred 70mm or more depending on the subject he shot. Paul took beautiful panos, and each would take up to 20 mins to set up and shoot. That is how much work that went into the pano during the early days of the DSLR. 

I remember during my days with Sony Asia Pacific, they asked my opinion what would be the next big feature. I told them it would things like Panoramic photography as well as HDR. They shrugged, and I never brought it up again. This was in 2008/2009. Deep down inside I knew the technology would be able to make the whole process so much easier and it was in 2010 that everything became a reality. 

Pano Photography as an afterthought

In the days before this pano feature was introduced in DSLRs, panoramic photographers were professionals with a skill that only connoisseurs appreciated. Today, no one would give two hoots about them. If you wanted to try your hand at it using a film camera, you can't go wrong with a Horizon. 


Technology has made them redundant, and the business has been democratised. Anyone with a smartphone today has the ability to shoot a pano image without dropping any sweat. All it takes is a steady pose, holding your smartphone the right way and deciding on how the subject should flow in your picture. How technology had changed the landscape was exciting, and demeaning to professionals who had spent a good part of their life developing a skill for it. You can virtually capture a pano in less than 1 min...using a compact camera or your iPhone. If you compared that with the Panos of old, where you had to literally spin a DSLR on a specially built tripod, well, that's 23 minutes shorter and probably saved you a whole lot of time on a PC trying to stitch them together too. 

And if you had a business card that says you're a panoramic photographer, all you will earn is a shrug from the very people you wish to impress. 

Composing the Pano is not Rocket Science

One of the challenges of shooting panos the old way was to get the Horizon on a level. If you were shooting from a hill or a slope, you had to make sure you had a spirit level on your tripod to find out if you are on level ground. So if you are not, you had to make the collapse the tripod legs to have the correct fit. 

This was made redundant with the 3 axis camera stabilisation, which detected minute movements and adjusted it during capture. 


Rule of Thirds, redux. The Entrance occupies two thirds of the frame while the hotel building takes a third of the frame

So these days, the camera detects your panning movement as long as you hold it still, you can capture a panoramic image without the use off a tripod. All you have to do is hold your Android or iPhone steady, pointed at the direction you want it to flow and move along the horizon line. That's it!

And as long as you have compose the image using the rule of thirds, then you're ok. The rule of thirds here means composing your subjects using a grid of thirds, and it is not the conventional rule of thirds where the subject in focus should be within the middle four points.

Dividing your picture by thirds and then putting your main and secondary subjects within these one third frames helps to give it breath and space. If not, it would be a mess. 

How Technology is making even Easier

I remember shooting my first mobile panoramic picture using an iPhone 3GS. The quality of the image wasn't great but it got the job done. Today, with the higher spec iPhones and Android devices, where the whole processing and stitching of the image is done within the device, there is no longer a need to shoot with a DSLR. 

Even DSLR's these days support a panoramic panning function that you can opt to use without a tripod. That said, no idiot who knows how to use a camera could ever get this wrong. 


Google's "Coming Soon" RAW image support

0

Not to be outdone by Nokia's announcement for DNG file support, Google has come out to say that RAW file APIs are coming for Google Android KitKat.

First, the API already exist in part within KitKat. Problem is, it's not activated as yet. Developers have seen bits of the API within KitKat but when will Google come out with the option to do this remains questionable.

RAW equals more Storage

That's right, a 8 megapixel sensor can yield up to a 8MB RAW file. This doesn't sound very good if you happen to have a 16GB device with no option to take in a microSD card. The new generation of sensors are already headed towards 16 megapixels and with that, you're dealing with even more storage problems.

RAW support will only be available on high end devices

Possible. The majority of folks have no need for RAW. If all you ever do is post to Instagram or Facebook, then a small JPG file will do just fine. High end camera phones within the same ballpark as the Nokia 1020 will have the ability to save in RAW whenever required but lower end devices running KitKat will probably not have that feature for the sake of taming this storage hungry requirement.

RAW support on selected Apps

There are apps on the iPhone that already does this. That is to convert the JPG files to TIFF. So far, there hasn't been much talk about this with the Apple fanboys as TIFF files are massive! Once Google green lights the API for RAW image capture, device manufacturers are not expected to give you this option automatically but you should be able to buy camera apps that will do this for you. Premium camera apps are far and few on the Playstore. The idea that you'd pay more for an app just coz of a bunch of filters is already passe. Serious amateurs will demand more control over their images and this is where RAW files will appease them.

RAW File Impact on Workflow

Another reason why RAW files may not be such a hit is that it will impact your workflow. Apps must have the ability to edit and open RAW files natively and without sufficient RAM, you won't be able to do this. Furthermore, RAW file editing is already possible via Google's Picasa, making good on the fact that Google will encourage you to consume more mobile data just to upload it to the cloud. Backing up to the cloud should only be performed through a Wifi connection.

Do you really need RAW?

Going forward, camera phones will eventually replace the DSLR and compact camera when it comes to casual photography. Apps can already dial in artificial 'bokeh' when there isn't any. It is just a matter of time when the right app comes along to do all this. Having RAW files at your disposal means that you will have access to untouched images from the sensor—which can then be used to generate all manner of effects with imaging quality rivaling that of upmarket compact cameras. Once this is achieved, you won't be taking that DSLR on holiday.


The Good, the Bad & Ugly of More Megapixels

0
Coloredorginal

I have often been asked about the Megapixel debate, is it some urban legend? Folklore? Or some old wives tale perpetuated by camera manufacturers? But what I am going to say is going to be based on facts, and having worked with Sony's DSLR division, I sort of know the good and bad of the megapixel race. All too often, we find ourselves confronted with decisions on which camera is better based on just the megapixel count of a sensor. Now more megapixel means more detail in a picture but only if it is exposed well. Put that context into a low light scene, the sensor's sensitivity comes into play and this negates any gain in detail. But let's not work on that. Let's assess what more megapixels will do for you.

The Good side of More Megapixels

Henri Cartier Bresson of Magnum, known fondly as HCB, didn't like his photos cropped but with more megapixels, cropping is actually good. Let's use a photo I took as an example. The original is above. Let's do a HCB time lapse into the world of B/W photography and turn this into a contrasty picture of a street scene.

Uncroppedmegapixel
The composition isn't spot on. There is lot of room and in the editorial room, it would be considered a "loose" photo since it is not tightly composed.


Croppedmegapixel
Here is the cropped photo, by throwing away rougly 1/3 of the size of the photo, it becomes a better picture. So if you happen to be shooting with a 24 megapixel DSLR, this image would be roughly 24MB in RAW size and after cropping, a third of frame, you are still left with 18MB of image data. Now that is a big image!

The BAD of having More Megapixels

High density sensors cost more to manufacturer and low light handling isn't as good.
Often, dynamic range will suffer as these smaller high density sensors just doesn't have the muscles compete unless helped along with brute force noise reduction steroids. Larger sensors handle light better but large high density sensor cameras also cost a bomb to own.

The UGLY side of More Megapixels

If you look at the above cropped pictures, and realize that you can take a "loose" picture and still rescue it later with cropping, don't you think that you'd be a loose photographer than a tight one? Pros everywhere have one strong point, they don't need any image cropping for it to come out right. Should you rely on more megapixels to save your day, then you will forever be dependent on it. By relying on post production miracles, you'd stop being a photographer and more of an image manipulator. This is the ugly side of photography which we all try to avoid but get sucked into. Cropping your image in-camera is the best way to go if you want to improve your sense of composition.


Conclusions

There is no right or wrong way to see this Megapixel Myth. The more insecure you are about your pictures, then the obvious route to take is to have more megapixels. The more confident you are about your photography, then the megapixel myth would have fallen away from you mind and in essence make you an even better photographer. So learn to work with what you have.

Shooting Speed: Motion Capture on the Fast Lane

0

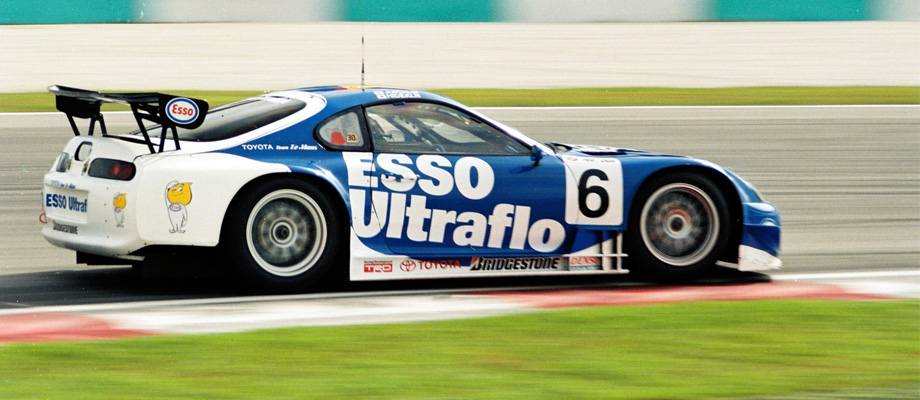
Speed. For professionals who hang around the track all day shooting racing cars, you pretty much end up with the same type of images because you are restricted by the angle that you are allowed to shoot. Often you find the same type of images floating around on the Web that shows some kind of speeding vehicle frozen at the exact moment in time. For stuff like this, you can't capture this unless you have a DSLR capable of up to 1/2000 of a sec shutter speed.

For me, I prefer shooting motion rather than freezing them as this gives a different look to the images instead of the same old, same old styles seen everywhere from billboard advertisements to print and web advertising.

When I started shooting these, I was still shooting on film. Imagine what I could have done with digital as it would have been a whole lot easier with the top of the line DSLRs you have today.

But the way forward is still the same. You gotta know your shutter speed. For motion capture like these, you need to know how to pan the camera.

Panning, as you follow your subject through a fixed path of motion, is what gives you the ability to capture speed and motion in your pictures.

Motion Capture Tips


  1. The best shutter speed to capture motion is 1/125 sec
  2. Make sure your subject is moving in a parallel line to your panning movement
  3. AF should be OFF (if you haven't got a spiffy DSLR with super fast AF)...AND 
  4. Prefocus your Distance to Subject
  5. Use a Monopod to steady your panning

The aperture value is irrelevant as long as there is sufficient light. If there isn't then dial up your ISO to 1600 and preset your Shutter Speed to 1/125. In the days of film, photographers were handicapped by the film speeds of between ASA/ISO 100 to 400. Shooting with ISO speeds of 800 were not widespread due to the grain. That is irrelevant these days with digital cameras which perform well with minimum grain at ISO3200.

Minimizing Background Blur at 1/250

Seems like it is frozen but notice that the wheels are turning
For others, you may want to minimize background blur by shooting at a slightly higher speed of 1/125 just to get the wheels in motion. This depends heavily on the distance to subject and of course the telephoto lens you are using. Shorter lenses (200mm) will need to capture at shutter speeds of 1/125 whereas longer telephoto lenses (above 300mm) will require shutter speeds (between 1/250 to 1/500). Longer telephoto lenses tend to magnify movement so less panning movement is required. The movement is very much amplified at longer telephoto lenses, say between 300mm to 800mm so you need to judge the speed in which the car or bike is carrying on a straight or around corners. The important thing here is to mount your gear on a monopod. You could also fashion a monopod out of a Tripod if you didn't know any better. Just don't use all three legs and only extend ONE of the legs out to help you balance your gear. Hand holding your camera is no recommended at longer focal lengths.


Shooting Around Corners

Motion panning can be done around corners as well but the effect is different, meaning that the subject is less sharp and appear to be blurry. That's because you use a slow shutter speed of 1/60 sec.

All vehicles will have to slow down to take a corner and when you are sitting smack in the middle of one, then you will be using a wide lens instead of a telephoto lens. A standard 50mm lens (full frame) would suffice.

You can of course use a wide angle lens such as a 35mm or 28mm if you are really close to the action—like when you can extend your hand out to touch them but that is rarely the case with racing circuits.


Freezing Motion

When you have a DSLR capable of 1/2000 sec shutter speed. It is very easy for you to freeze motion. You can also freeze motion at 1/250 when the vehicle is in low speeds around corners.


This is probably the first place you will find most trackside photographers camping out. They will of course choose the same angles as everyone else as action shots don't really differ much from one location to another when you want to freeze the action. Getting to a high or low place depends on your access to the track. If you have clear access to trackside shooting spots, you will probably get a chance to use a longer telephoto lens on dedicated racing circuits.

Street circuits, like Monaco and Macau, require lower telephoto ranges, around 200mm and less since you don't have a lot of places on the track which you can fully utilize 300mm. The most common uses for a 300mm lens is a head on shot during the start of the race as all the cars are bunched up together running into the first corner. After this, you'll have to pick out your targets one by one as the race progresses.